http://www.coker.com.au/bonnie++/
http://www.coker.com.au/bonnie++/experimental/
Bonnie++ is based on the code for Bonnie by Tim Bray. It is a benchmark suite that is aimed at performing a number of simple tests of hard drive and file system performance. Performing several I/O tests, including sequential and random input and output, randomseeks, and sequential and random creates and deletes.
Bonnie++ 是一個基於 Tim Bray 所發展的 Bonnie 硬碟效能測試程式改良而來的強化版,最主要的改進在於新增了對 2GB 以上檔案大小的測試,以及指定某子目錄下進行大量檔案或目錄的操作 (包含建立/刪除/覆寫 ...等等),且其 Testing items 比 bonnie 較多一些 。
■Download source , build and install.
# cd /share/apps
# mkdir benchmarks
# mkdir benchmarks/bonnie++
# cd benchmarks/bonnie++
# mkdir bin src
# cd src
# wget http://www.coker.com.au/bonnie++/bonnie++-1.03a.tgz
# tar -zxvf bonnie++-1.03a.tgz
# cd bonnie++-1.03a
# ./configure --prefix=/share/apps/benchmarks/bonnie++
# make ; make install
■bonnie++(V1.03)的使用方法。
usage: bonnie++ [-d scratch-dir] [-s size(Mb)[:chunk-size(b)]]
[-n number-to-stat[:max-size[:min-size][:num-directories]]]
[-m machine-name]
[-r ram-size-in-Mb]
[-x number-of-tests] [-u uid-to-use:gid-to-use] [-g gid-to-use]
[-q] [-f] [-b] [-p processes -y]
以下為常用的參數說明:
-d 生成測試檔案的路徑。
-s 生成測試檔案的大小,以M為單位(如果不使用-r參數,則要求文件大小至少是系統記憶體的2倍)。
-m 機器名,實際上可以認為是本次測試的方案名字,可以隨便定義。預設是本機的hostname。
-r 記憶體大小,指定記憶體大小,這樣可以透過-s參數創建 r*2 大小的文件,通常用於縮短測試時間,但是需要注意這樣由於記憶體的cache可能導致測試結果的不準確。
-x 測試的次數。
-u 測試檔案的屬主和群組,預設是執行bonnie++的當前用戶和當前群組。
-g 測試檔案的群組,預設是執行bonnie++的當前群組。
-b 在每次寫文件時調用fsync()函數,對於測試郵件伺服器或者數據庫伺服器這種通常需要
同步操作的情況比較適合,而不使用該參數則比較適合測試copy文件或者編譯等操作的效率。
■指令使用範例
bonnie++ -u 0 > bonnie.result
==>測試程式將以記憶體的兩倍大的預設值,進行檔案 create read erase rewrite 等動作。
Bonnie -m cfhat5 -n 50:0:0:50 -u 0 -r 4092 -s 0 -b -d $Dir
==> Testing with zero size files
bonnie++ -m cfhat5 -n 10:1000000:100000:10 -u 0 -r 4092 -s 0 -b -d $Dir
==> Testing with 100Kb to 1Mb files
bonnie++ -m cfhat5 -n 1:17000000:17000000:10 -u 0 -r 4092 -s 0 -b -d $Dir
==>Testing with 16MB size files
bonnie++ -d/work1 -s10 -r4 -u0
==>其對加載在/work1目錄下的文件系統進行了10Mb(-s10)的測試。因此在執行測試之前必須創建適當類型的文件系統並加載到目錄/work1下。其他的參數指定內存大小(-r4)的M數,和以root身份運行測試程序,測試結果如下: 每種測試都有兩組數據:文件系統速度(K/sec)和CPU佔用率(%CPU)。速度越高,文件系統越好。而對于CPU率來說,數字越小性能越好。
#bonnie++ -d /home -s 2048:16384 -n 0 -m nx7000.maxtor250gb72 -x 1 -r 1024 -u 0:0 -f
==>Write/Read tests on a 2Gb file using 16Kb blocks.
#bonnie++ -d /home -s 4096:32768 -n 0 -m nx7000.maxtor300gb54 -x 1 -r 1024 -u 0:0 -f
==>Write/Read tests on a 4Gb file using 32Kb blocks.
bonnie++ -u root -d /tmp
bonnie++ -s 2048 -d /var/tmp -u root
bonnie++ -s 1g -n 10 -x 5
bonnie++ -u 500:100 -s 250
bonnie++ -f -d . -s 3072 -n 10:100000:10:10 -x 1
bonnie++ -s 100 -r 50 -u root -n 0 -f -d /output_files
bonnie++ -d /testdata -m sun3510 -s 2048 -r 1024
bonnie++ -m cfhat5 -n 0 -u 0 -r 4092 -s $SIZE -f -b -d $Dir
bonnie++ -d $Dir -s 10g -n 5
■執行結果範例:
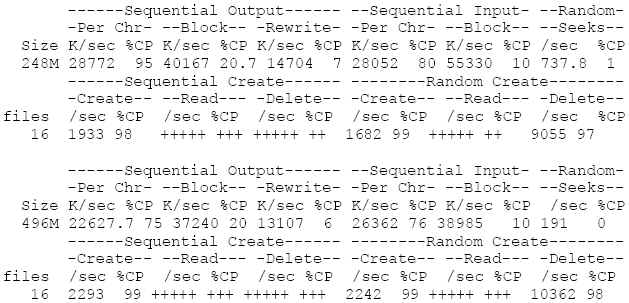
依次進行解讀,從Writing with putc()開始到Delete files in random order…結束,這是bonnie++作的12項測試,這12項測試依次對應12項結果,而這12項結果又被分為了5大類,分別是Sequential Output(寫測試),Sequential Input(讀測試),Random Seeks(讀寫測試),Sequential Create(順序讀寫文件測試)和Random Create(隨意讀寫文件測試)。
測試步驟和測試結果依次對應的順序如下︰
Writing with putc() -> Sequential Output的Per Chr
Writing intelligently -> Sequential Output的Block
Rewriting -> Sequential Output的Rewrite
Reading with getc() -> Sequential Input的Per Chr
Reading intelligently -> Sequential Input的Block
start 'em -> Random Seeks
Create files in sequential order -> Sequential Create的Create
Stat files in sequential order -> Sequential Create的Read
Delete files in sequential order -> Sequential Create的Delete
Create files in random order -> Random Create的Create
Stat files in random order -> Random Create的Read
Delete files in random order -> Random Create的Delete
每個結果中又包括了2項數值,一個是K位元組數或者檔案數,另一個是%CP,就是執行這項測試時CPU的平均佔用率。再來說明每個測試結果的含義︰
Sequential Output
1.Per Char
就是 Per-Character 的含義。使用putc()函數進行循環寫入,每次寫入的位元組很小,基本上可以放入任意一種 I-Cache 中,這種情況下的CPU消耗在處理putc()代碼和分發磁片文件空間上。
2.Block
使用write(2)函數創建文件。這種情況下的CPU消耗只是在分發磁片檔案空間上。
3.Rewrite
使用read(2)函數讀取文件,然後修改再用write(2)函數寫回。由於檔案的空間已經分發好,所以這種模式可以很有效地測試文件系統緩存和數據傳輸的速度。
Sequential Input
1.Per Char
使用getc()函數循環讀取檔案內容。
2.Block
使用read(2)函數循環讀取文件內容,有效測試磁片讀取的效率。
Random Seek
用read(2)函數讀取文件的block,同時有10%的操作是用write(2)函數將block修改以後寫回文件中。在這個測試中,如果記憶體容量大於所創建的檔案大小,那麼將會出現比較高的數值,而這個數值可能並不能準確反映磁片本身的I/O效率。
Sequential Create和Radom Create
這兩大類測試均是用創建,讀取,刪除大量的小檔案來測試磁片效率。文件名用7位數字和任意個數(0-12)的任意英文字母來組成。在 Sequential 部分,字母在數字之后,而 Random 部分則是字母在數字之前。創建檔案的最小值和最大值等參數可以在bonnie++命令行中用-n參數來控制。

5 則留言:
Hello~你好~我想要請問一下~我在安裝bonnie++時,會出現checking for g++ --- no之外,他還會顯示checking for C++ compiler default output... configure: error: C++ compiler cannot create executables.請問一下我是弄錯那裡了嗎??謝謝
ps:我是執行到"# ./configure --prefix=/share/apps/benchmarks/bonnie++"
我的猜測你會不會是Compiler沒有安裝好,或是環境設定有問題.你可以參考看看下列建議:
http://www.eygle.com/archives/2004/10/use_bonnie_plus2_test_iospeed.html
hello~你好~真的是我的complier 沒有裝好~非常感謝你~解決我的問題~3Q
不用客氣呢~~
您好,
當我執行bonnie++時,會有錯誤:
-----------------------------------# ./bonnie++ -d /data -s 10 -m W88
./bonnie++ -d /data -s 10 -m W88
./bonnie++: 1: Syntax error: ")" unexpected
#
-----------------------------------
請問有遇到過嗎?該如何解決呢?
謝謝!
張貼留言